
Adding a New Medication Manually
For: Administrators, Nurses
Many ALIS teams will benefit from utilizing a Pharmacy integration, so that order information entered by pharmacy staff for their tracking purposes can help us create the orders in ALIS. This saves time entering the order details and allows us to be aligned with the pharmacy on these details. For more information about processing orders using a pharmacy integrations in ALIS, check out these two articles:
Pharmacy – Processing Resident Messages
Pharmacy – Processing Medication Messages
If it is not possible to integrate with your community’s long term care pharmacy, or if there is an extenuating circumstance in which you may need to quickly add a new order to the resident’s MAR, we can always add orders manually on a resident’s Manage Orders page.
Don’t forget: we can add orders for Applicants in ALIS too! This means we can get the medications all set up prior to admission.
1 – Go to a resident’s Manage Orders page.
There are a couple of ways to get there:
-
- In the Medications menu at the top, click on Manage Orders. This takes us to a landing page where we can search for a resident or applicant name in the space provided and click “Manage Orders”. This is also the page where we can export MARs and Physician Orders documents in bulk!
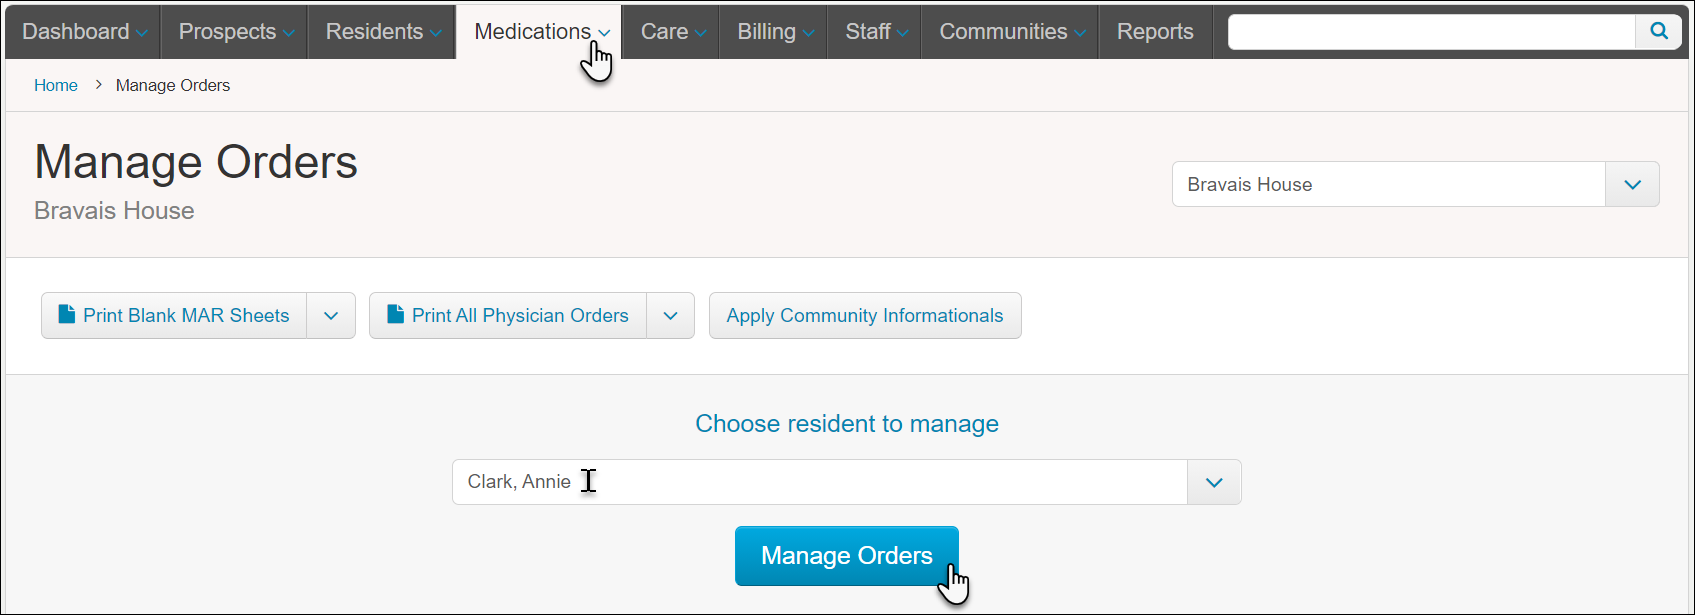
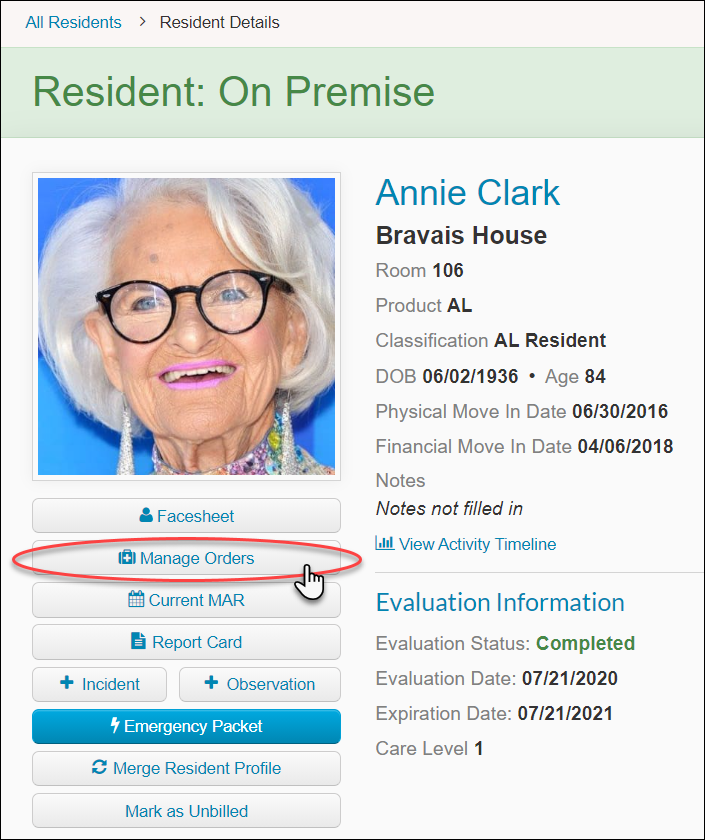
- From a resident (or applicant) profile, click the Manage Orders button beneath their photo.
- Additionally, if you are on any medications pages (Pass Meds, Administer PRNs, Pharmacies, Medication-related Reports), clicking the resident’s name will take you to their Manage Orders page.
- In the Medications menu at the top, click on Manage Orders. This takes us to a landing page where we can search for a resident or applicant name in the space provided and click “Manage Orders”. This is also the page where we can export MARs and Physician Orders documents in bulk!
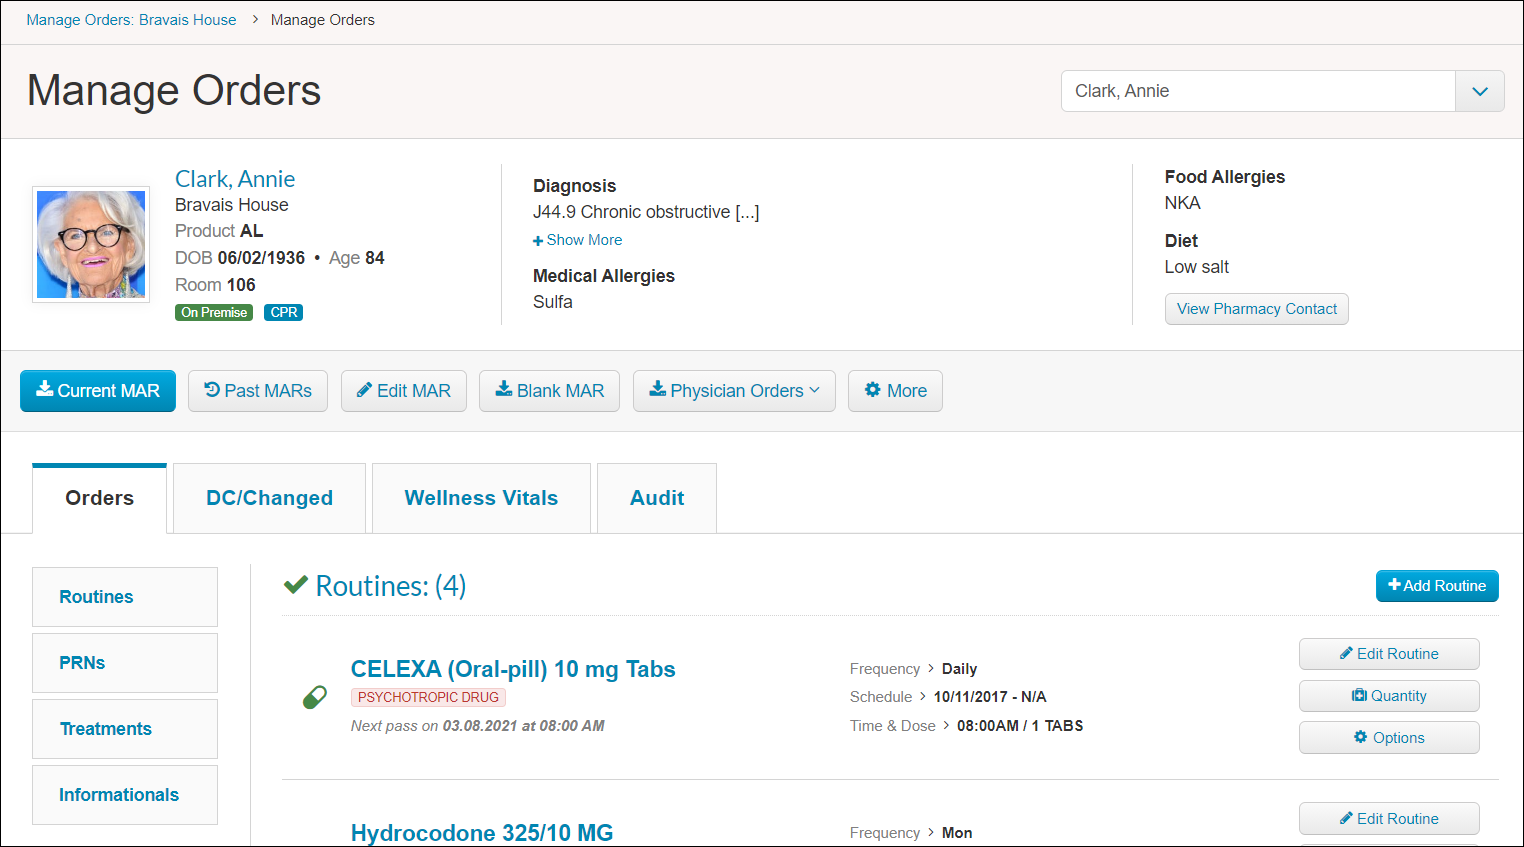
Manage Orders displays the resident’s basic details at the top of the page, has a few buttons for generating documents and taking bulk actions on the orders, and is then split between four tabs. For adding an order, you only need to focus on the main left-most tab, Orders. You may find it useful to look in the DC/Changed tab or the Audit tab for historical order information.
2 – Add the Order
- Within the Orders tab, we have the four different types of orders linked on the left column of the screen: Routines, PRNs, Treatments, and Informationals.
- We must determine which type of order we are adding, and go to the correct section.
- We can either scroll down to find the appropriate order section, or click one of the options in the left column to jump there.
- At the top of each section we will have a button on the right to add the order of each type.
- The first and most utilized is Routines, referring to routine medications.
- When we click the +Add Routine button, this is how we will add a routine medication to go on the resident’s MAR.
- Our first section of four on the page is Prescription & Refill Information. In this location we can track prescription dates and keep an uploaded file of the prescription. This section is often skipped an will not impact your MAR or Pass Meds records.
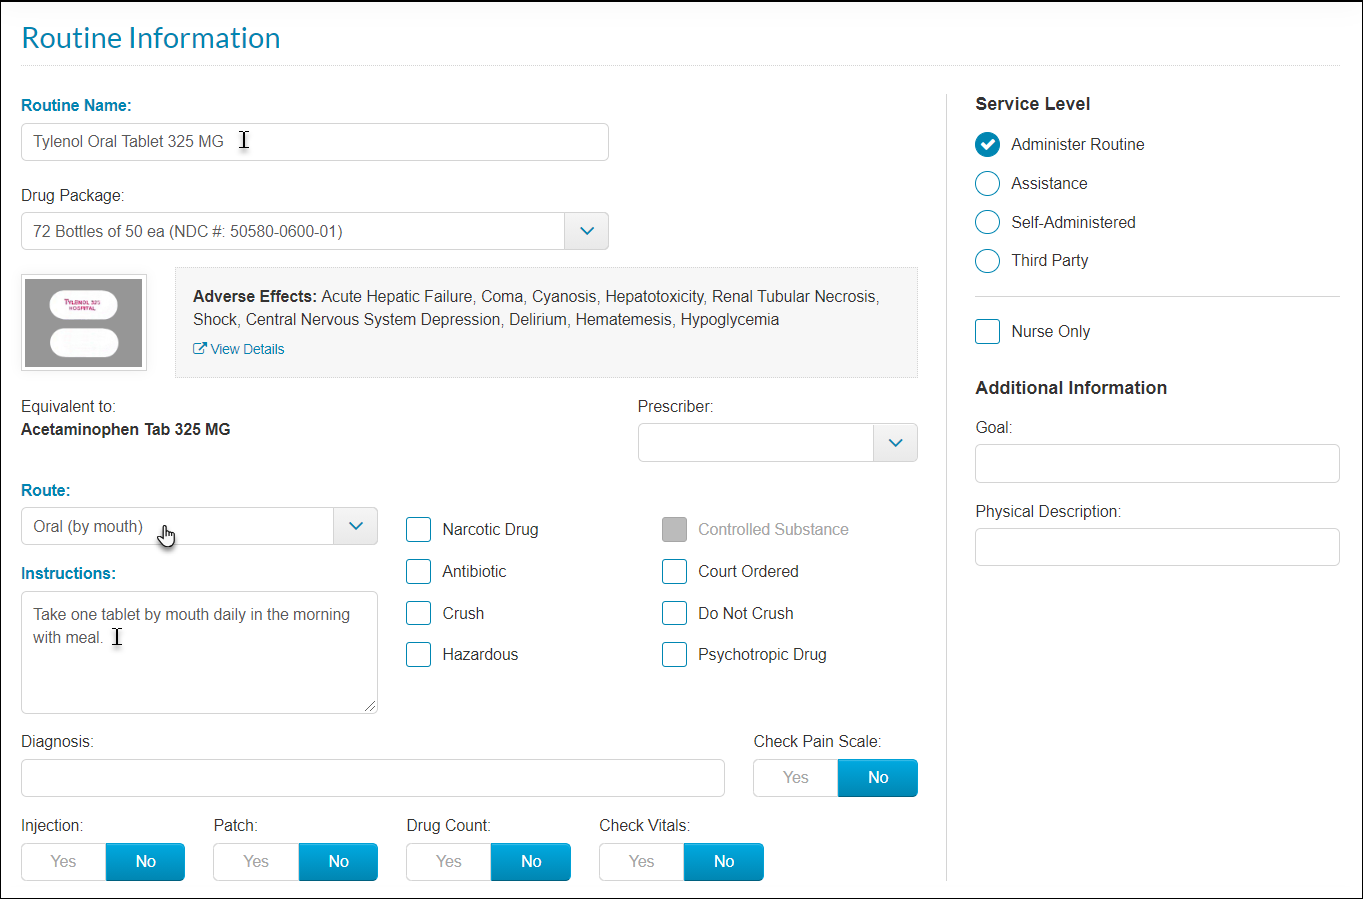
- The second section Routine Information is where we will add most of the details of the order. Required are the Routine Name, Route, and Instructions. There are several other useful details here to configure for displaying on the MAR and for your team on the Pass Meds page.
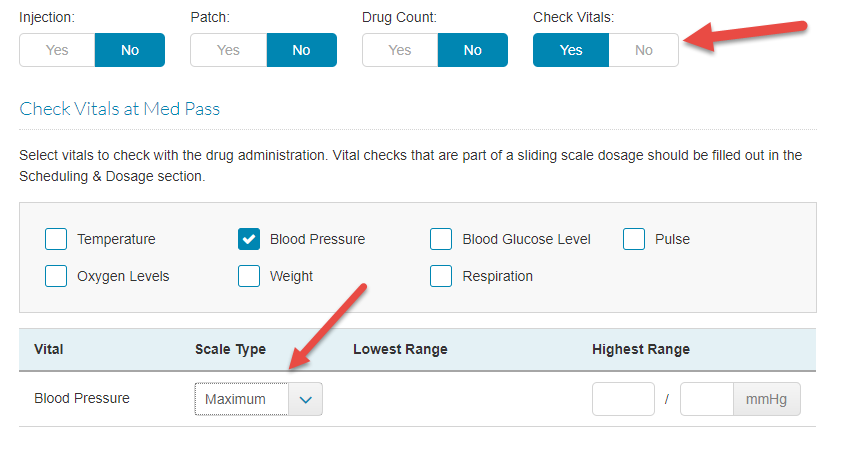
- If you select Yes for the Check Vitals toggle, all of the vitals selections will expand and you can select which vital must be recorded before the med can be administered. You can leave the Scale Type column as No Range if you would not like to set limits for the vital, and you also have the options Fixed, Minimum, and Maximum. If you choose only Minimum or Maximum, you can set a value for those, and the Fixed scale allows you to set both a minimum and maximum acceptable value for a vital.
- If you select Yes for the Check Vitals toggle, all of the vitals selections will expand and you can select which vital must be recorded before the med can be administered. You can leave the Scale Type column as No Range if you would not like to set limits for the vital, and you also have the options Fixed, Minimum, and Maximum. If you choose only Minimum or Maximum, you can set a value for those, and the Fixed scale allows you to set both a minimum and maximum acceptable value for a vital.
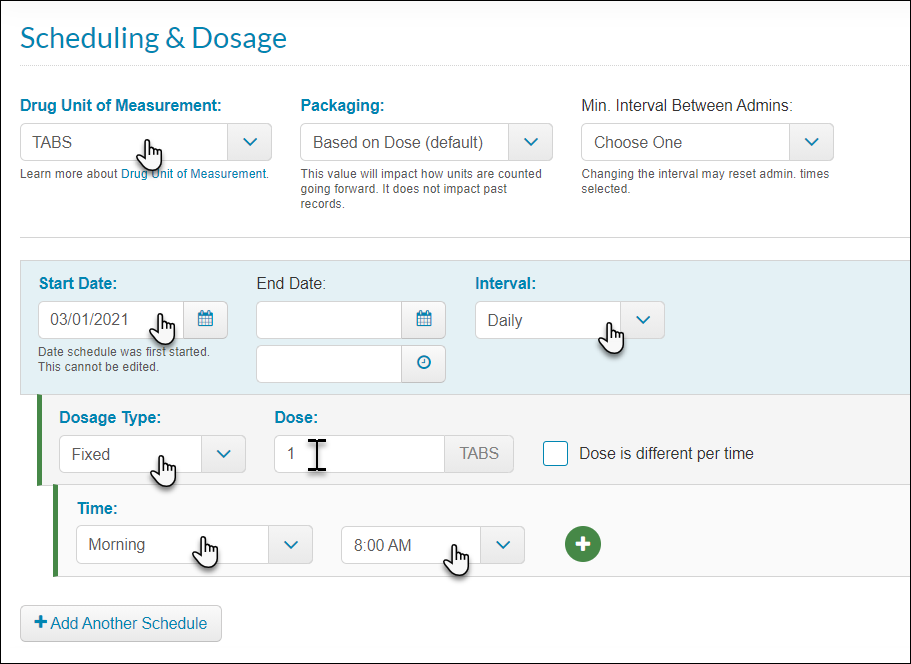
- Our third section is Scheduling and Dosage.
- Enter the Drug Unit of Measurement. This is the physical form of the medication that the resident will take, such as tablets (TABS) or capsules (CAPS).
- Please take the following steps to ensure that the order will be scheduled accurately on the resident’s MAR and Med Pass in ALIS:
- The first part of the scheduling section is the Start Date field – this is the date the medication was started for the resident, not the date the medication will start in ALIS. If you set a date for the past, this displays correctly for records, but it is not possible to add the order to the Med Pass or MAR in the past.
- You also have the option to add an end date for the medication – for example if the resident is on an antibiotic for 10 days you can enter an end date and ALIS will schedule the med through that date.
- Select the schedule Interval. This is how often the order will occur on the Med Pass.
- Add the Dosage Type (this is the pattern of how the schedule recurs), the Dose amount, and Time(s) the medication should be administered.
- If a med is administered more than one time per day click the green plus sign next to the time.
- If there is an additional schedule that the order will follow, click +Add Another Schedule below the time.
- For more complex order schedules, refer to the following articles:
- The last section is Med Pass Scheduling Information. Most likely you will not need to update anything here.
- Once all required fields have been filled in with the correct information, you can click the Create Order button at the bottom right. If orders are enabled for the resident, the next administration time will display on Pass Meds!
- If your resident is still in the applicant stage, this order will be essentially queued up for Pass Meds when you Move In the Applicant.