ALIS COVID-19 Center
This guide overviews the COVID-19 Center in ALIS, as well as other locations where you can document tests, vaccines, and store relevant documents. These tools are already available for you to begin documenting for your residents and staff!
Why use the ALIS COVID-19 Center?
The pandemic tracking tools in ALIS allow us to document key pieces of information in order to stop the spread of infection. We can use ALIS to communicate details internally and export files for clinicians. The COVID-19 Center is optimized for documenting the outcomes of vaccine clinics.
Quarantines and Isolation
- The word ‘Quarantine’ is the default option for naming residents and staff with an isolated status. We can update this to be ‘Isolation’ or any other word you prefer to designate for individuals with this status. Contact ALIS Support to update this for you. When this status is active for a resident or staff member, it displays at the top of a resident’s or staff member’s profile and a few other locations throughout ALIS.

- Please notice that you will need to specify whether you are looking at information for Resident or Staff quarantines using the toggle at the top right of your screen.
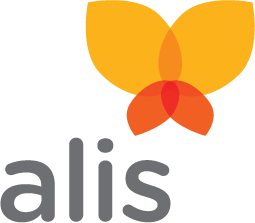
- We can quickly add a quarantine status for one or more individuals from the COVID-19 Center or from their resident or staff profile:
- In the COVID-19 Center, the first tab is Quarantine Schedules. Here is where we can click the blue +Add a Schedule button, and this opens a pane from the right of your screen so you can choose one or more residents (or staff) and their quarantine Start Date. Other details are not required, but it is recommended to add the time, end date and time if you know them, and especially the reason for quarantine. Here we can also add any notes.
- Here we can also click the checkbox next to Create Observation in order to create an item in the Observation Center for communicating with other members of your team.
- You must choose an Observation Type before submitting the schedule and creating the Observation Note.
- Decide on a policy for which Note Type should be used for this information. It may make sense for you to use an existing type like Nurse’s Notes or to create a type specifically for COVID-19.
- In the COVID-19 Center, the first tab is Quarantine Schedules. Here is where we can click the blue +Add a Schedule button, and this opens a pane from the right of your screen so you can choose one or more residents (or staff) and their quarantine Start Date. Other details are not required, but it is recommended to add the time, end date and time if you know them, and especially the reason for quarantine. Here we can also add any notes.
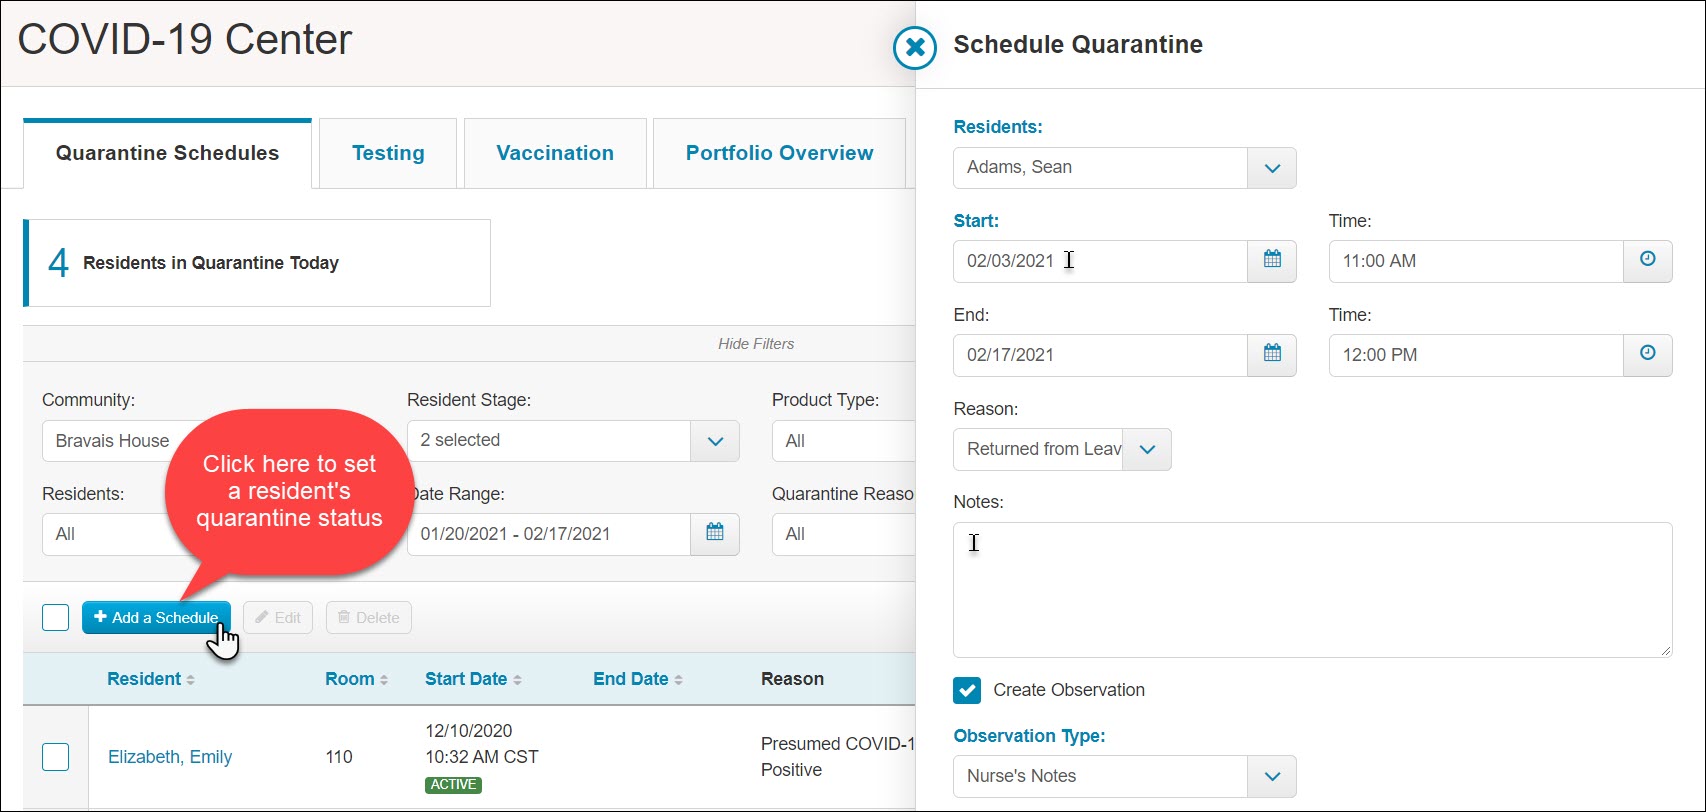
- In the Quarantine Schedules tab of the COVID-19 Center, we can quickly see how many individuals are in quarantine today. This tab also allows us to filter the schedules by resident Product Type, Date Range, Quarantine Reason, etc. to view the information in the table below. This will also update the Summary at the bottom left of the screen to show the data by Quarantine Reason. Use the Print and Export to Excel buttons to send or print the information.
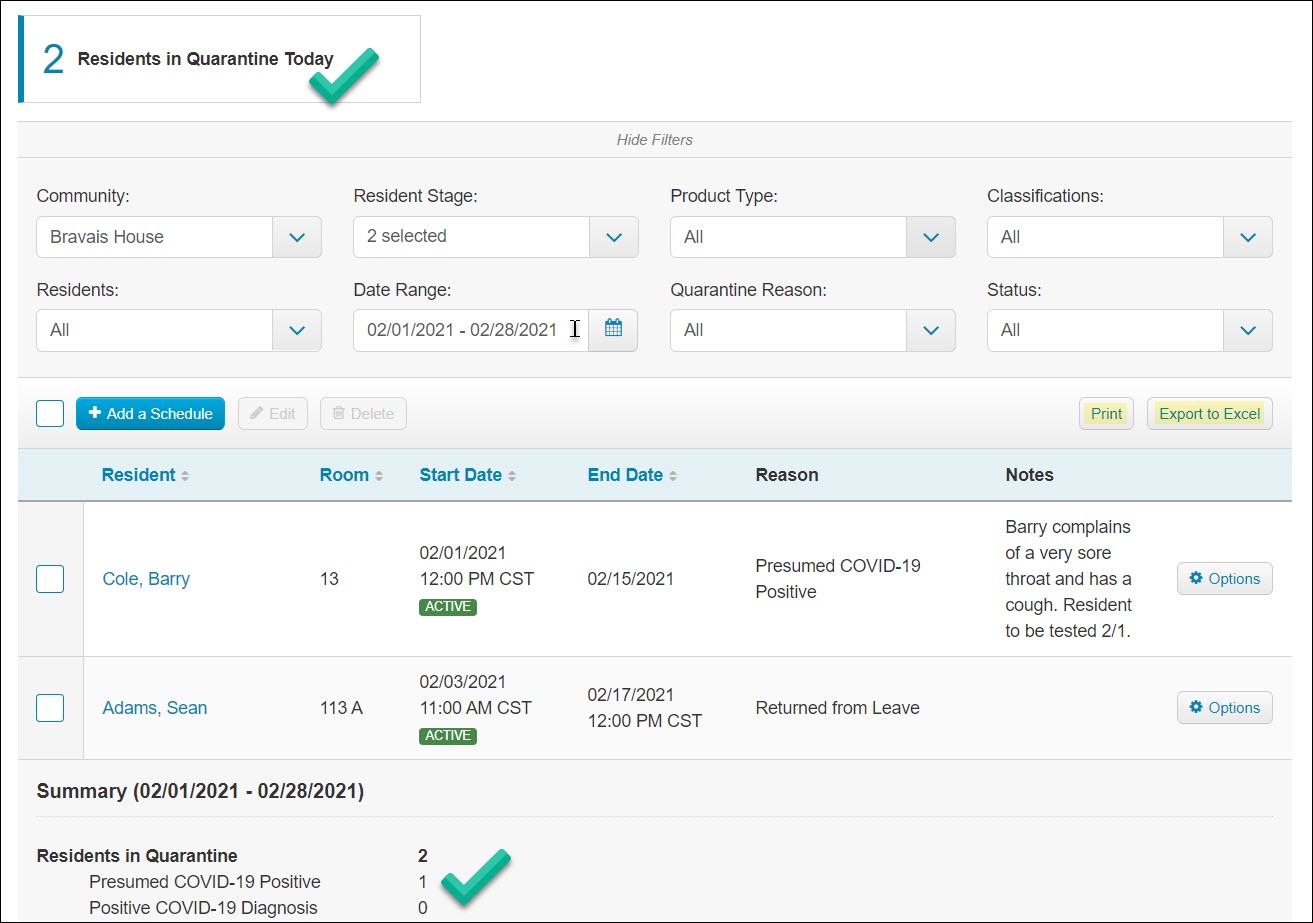
- If you are on the resident’s or staff member’s profile, scroll to the section in the first group of blue bars titled COVID-19 Tracking. Click the blue bar to open it, and find the Add a Schedule button to open the Schedule Quarantine pane. Follow the instructions in step 2 above to add the schedule.
- You can view and update any schedule listed there using the options button to the right.
- All information recorded about a resident’s quarantine schedules, COVID-19 tests, and COVID-19 vaccines will be searchable in the Audit History at the bottom of their Resident Profile. This is also true for staff profiles.
COVID-19 Tests
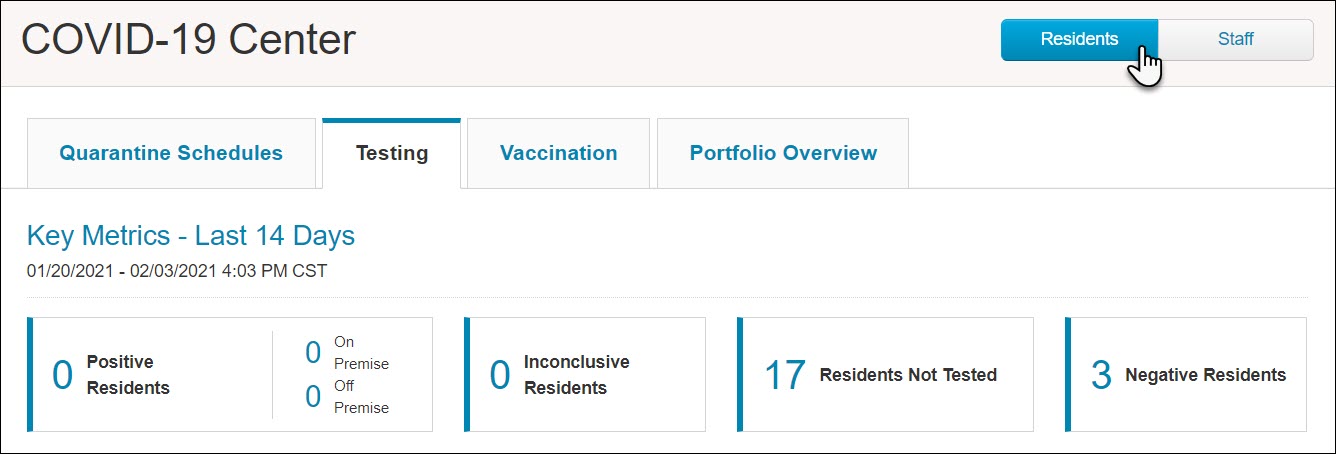
- Here we document tests and results for both residents and staff. When we access the COVID-19 Center Testing tab, we first have some Key Metrics about tests in the last 14 days. This will always show us the most recent 14 days, and is not affected by the filters below.
- Please notice that you will need to specify whether you are looking at information for Resident tests or Staff tests using the toggle at the top right of your screen.
- There are two buttons for adding tests in the COVID-19 Center.
- The +Record Test button will allow you to record tests for one or multiple people that occur on the same day and time, and which you would like to add the same note.
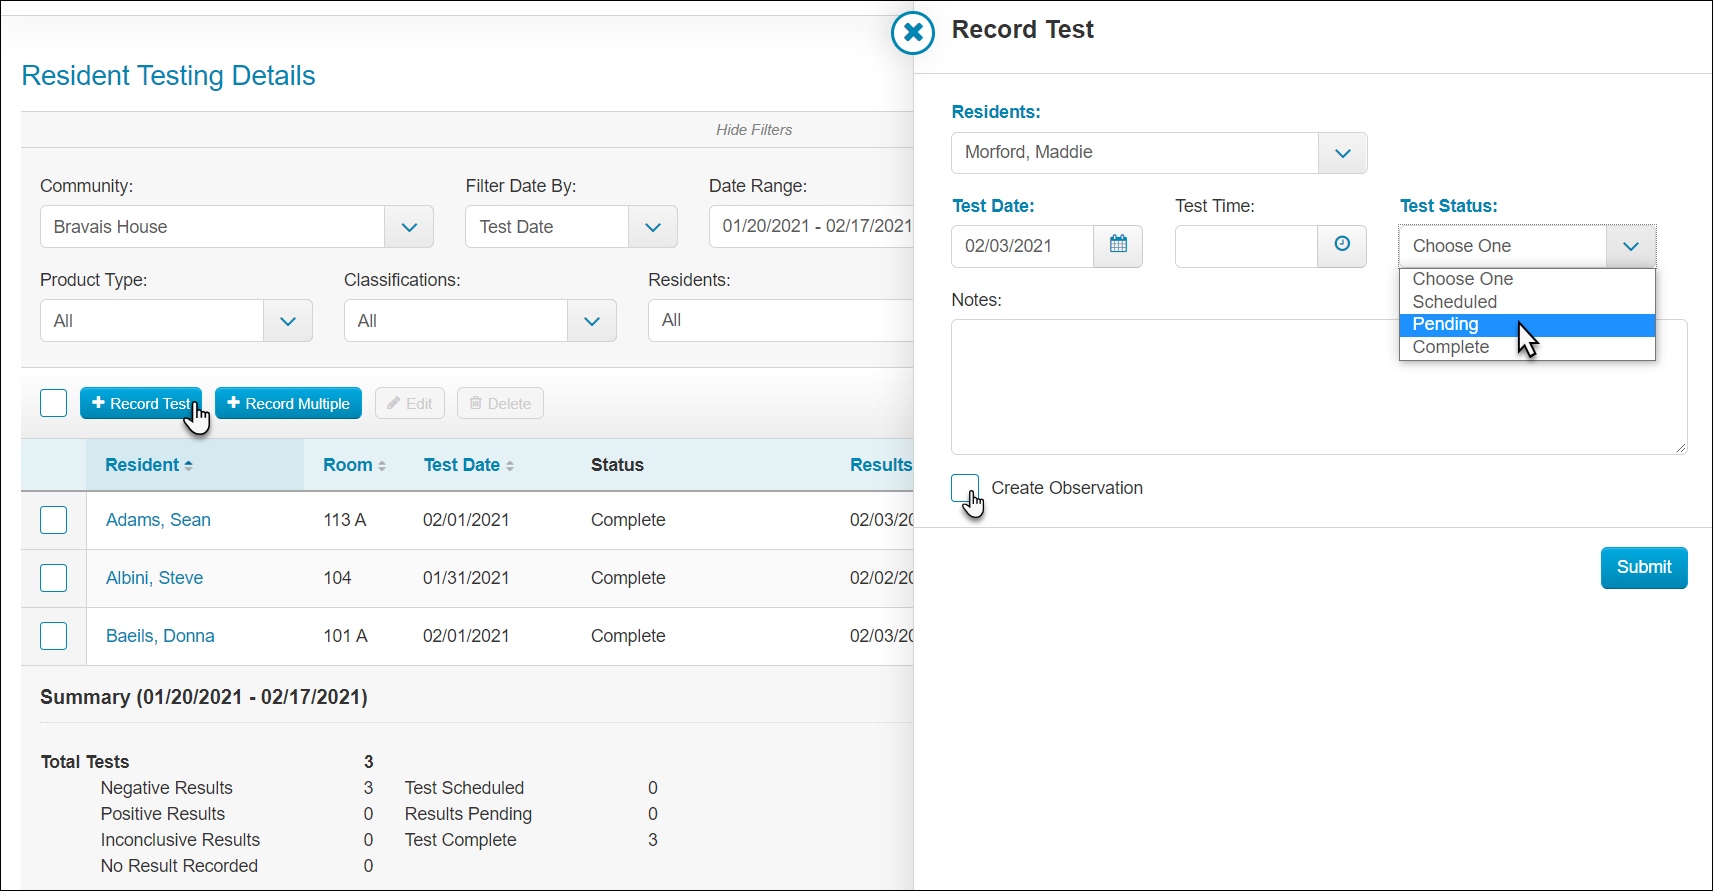
- Here we can also click the checkbox next to Create Observation in order to create an item in the Observation Center for communicating with other members of your team.
- You must choose an Observation Type before submitting the schedule and creating the Observation Note.
- Decide on a policy for which Note Type should be used for this information. It may make sense for you to use an existing type like Nurse’s Notes or to create a type specifically for COVID-19.
- If you are recording tests for multiple people, each will be recorded with separate Observation Note that contain only their singular name.
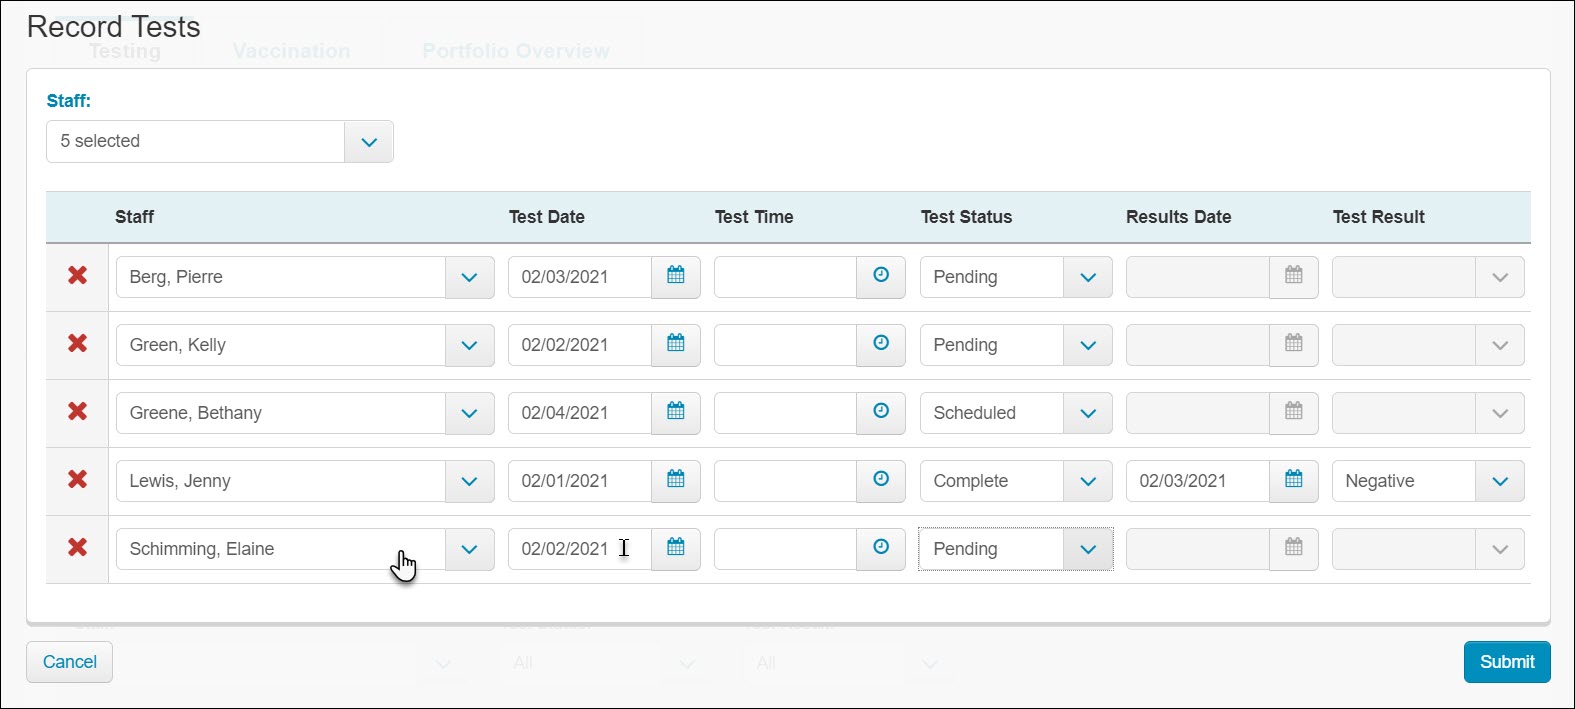
- The +Record Multiple button will give you a table that allows all the details to be different for each person. This option does not allow you to record an Observation Note.
- The +Record Test button will allow you to record tests for one or multiple people that occur on the same day and time, and which you would like to add the same note.
- We have a summary at the bottom left of the page to show you the plain numbers for total tests, results, and statuses based on the date range selected in the filter above.
- Notice the Print and Export to Excel buttons if you need to view/print the filtered information in PDF or Excel formats.
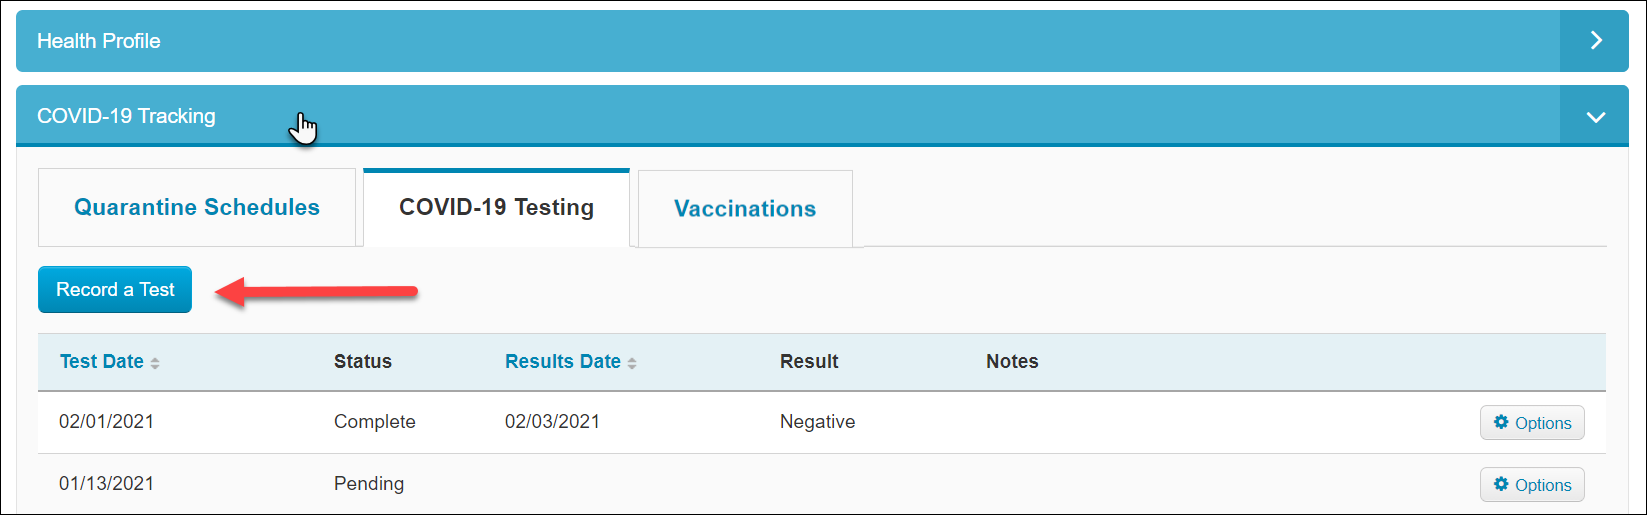
- Additionally, this information can be captured on the Resident Profile or Staff Profile in the COVID-19 Tracking section. In this blue bar, we have a COVID-19 Testing tab where we can see all tests that have ever been recorded. We can Record, Edit, and Delete tests from here.
- All information recorded about a resident’s quarantine schedules, COVID-19 tests, and COVID-19 vaccines will be searchable in the Audit History at the bottom of their Resident Profile. This is also true for staff profiles.
COVID-19 Vaccine Tracker
- Here we document consent and vaccinations administered to residents and staff. We follow a workflow for each person so that all names end in one of the bottom two sections of the page: All Doses Received or Will Not Vaccinate.
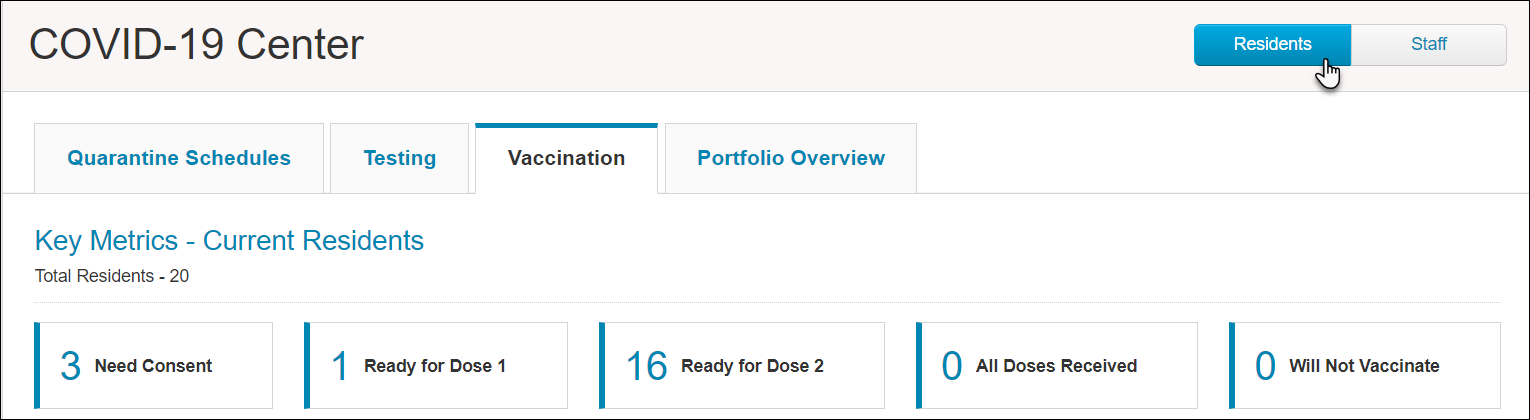
- Please notice that you will need to specify whether you are looking at information for Resident tests or Staff tests using the toggle at the top right of your screen.
- First we have to record consent for each individual person. This gives us the option to select which manufacturer of the vaccine they will receive or whether their name is added to the Will Not Vaccinate list.
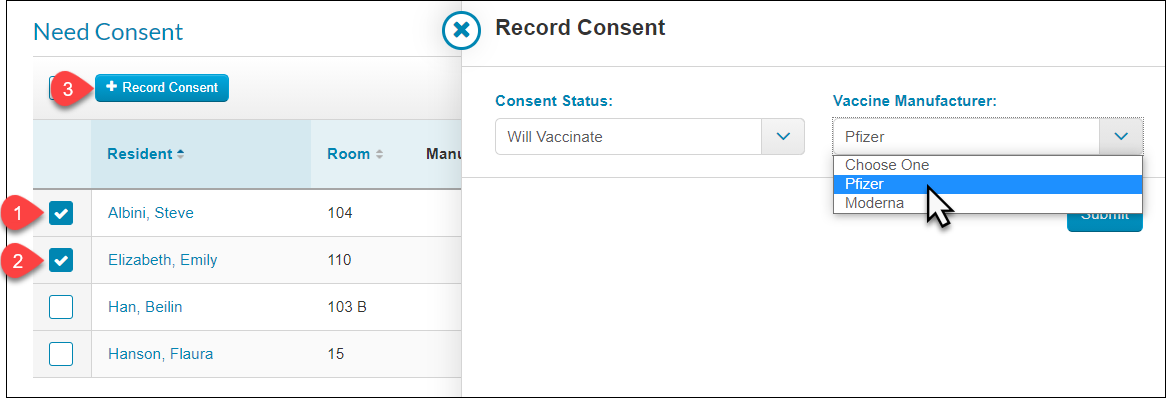
- In the Need Consent section, click the checkbox of one or more people and click the +Record Consent button at the top of the table.
- This opens a pane from the right where you must select ‘Will Vaccinate’ or ‘Will Not Vaccinate’.
- If you choose ‘Will Vaccinate’, you must then select one of the Vaccine Manufacturers.
- Click Submit. The person’s name will either go to the Dose 1 section or the Will Not Vaccinate section.
- If you want to keep track of consent documents in ALIS, it is necessary to do this on the resident profiles. Contact ALIS Support and we can create for you a Resident Compliance Item.
- Next, we can create the Clinic Export file for the vaccine clinic. When you click the Clinic Export button, this creates an Excel file that includes the demographic and insurance information captured in ALIS for all people who have given their consent. Ideally this may be exactly the information your clinic administrators are requesting!
- At last we are ready to schedule or record the first doses of the vaccine.
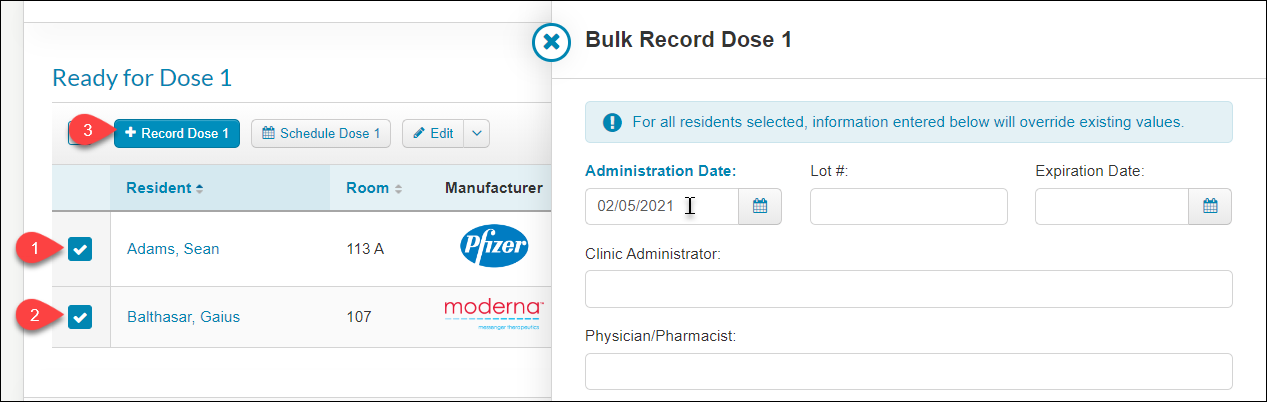
- In the Ready for Dose 1 section of the page, use the checkboxes to the left of the names to select one or more people.
- To schedule the first dose for the selected people, click the Schedule Dose 1 button above the table. This allows you to enter the anticipated date of the dose.
- Click +Record Dose 1 to document the date of the dose, and optionally add the Lot #, Expiration Date, Clinic Administrator, Physician/Pharmacist, and any additional notes.
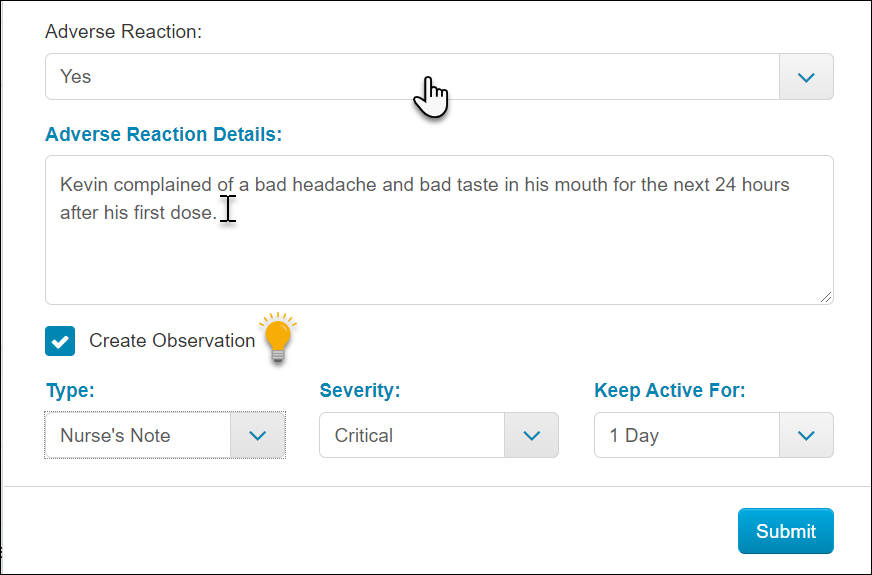
- By default, submitting the dose record will record no Adverse Reactions. To add Adverse Reactions, change the menu to Yes, and type the details of the person’s reaction. You may be more likely to add these to a dose that was already recorded. Do this by clicking the Edit button to the right of any person’s name.
- We can also send all of this information to create an Observation Note, similar to the Observation Notes created for quarantine schedules and COVID-19 tests.
- Once you have recorded Dose 1, the person’s name moves to the next section to schedule or record Dose 2.
- You can override any of the previously entered information using the Edit button on to the right of each individual name, or you can click checkboxes next to multiple peoples’ names and use the Edit button above the table to Bulk Edit any information.
- Notice the smaller arrow button next to the Edit buttons. This allows us to Revert Consent (you may need to do this if the Vaccine Manufacturer changes) or Restart Vaccinations.
- Almost done! When you are ready to schedule or record the second doses of the vaccine, follow a similar pattern in the Ready for Dose 2 table as you did for the Ready for Dose 1 table.
- Use the checkboxes to the left of the names to select one or more people and click the buttons above the table to either Schedule Dose 2 or +Record Dose 2.
- The same as the above section, you can always use the Edit buttons to override previously recorded details, or use the smaller arrow button to Revert Consent or Restart Vaccinations.
- Once Dose 2 is recorded for someone, their name moves down to the All Doses Received section, where you will be able to Edit the details if necessary.
- Back near the top of the screen, notice you can filter the information by vaccine status, resident stages and product types, or staff stage. Then, you can use the print Print and Export to Excel buttons just below the filters to the right in order to generate PDF and Excel files of all the details documented here.
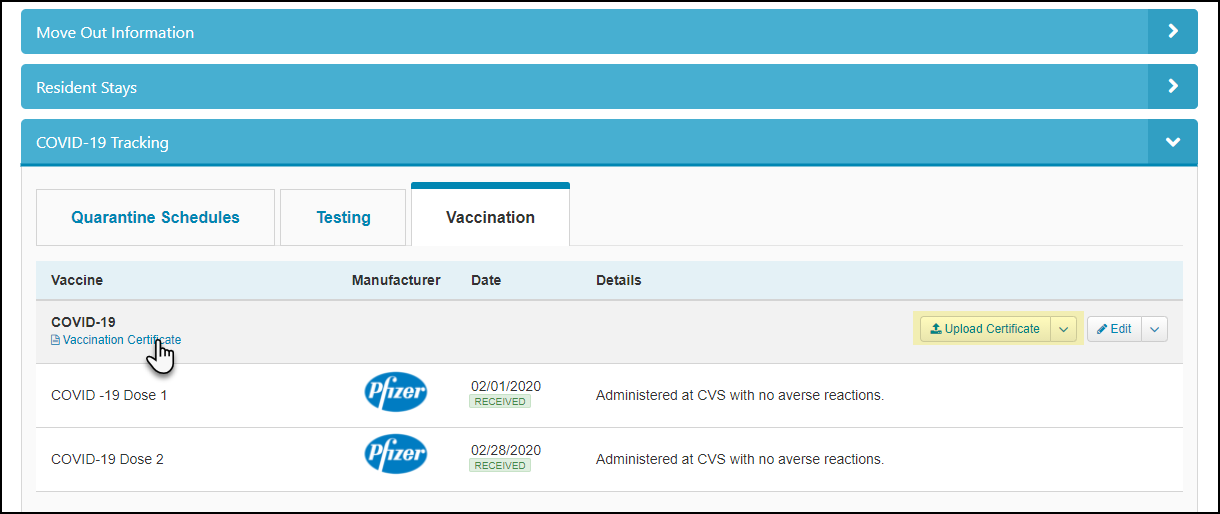
- Additionally, this information can be captured on the Resident Profile or Staff Profile in the COVID-19 Tracking section. In this blue bar, we have a Vaccination tab where we can see all vaccine details that have been recorded. We can Record, Edit, and Delete vaccine details from here. We can also upload Vaccine Certificates here!
- All information recorded about a resident’s quarantine schedules, COVID-19 tests, and COVID-19 vaccines will be searchable in the Audit History at the bottom of their Resident Profile.
Vaccination Documents
These can be added in the COVID-19 Center or on the Vaccination tab in the COVID-19 Tracking area of a resident or staff member’s profile. Use the Upload Certificate link to upload a file scanned into your computer. This way, you will always be able to export these documents from ALIS if you need them in the future.
ALIS also gives us the option to store Vaccine documents in Resident Compliance and Staff Compliance. We can set these as optional items, and use the Compliance Details reports to keep track of who has the documents uploaded. This is most likely paper that must be scanned and uploaded to ALIS. Contact your onboarding manager or ALIS Support for help setting this up. Click here to learn more about uploading documents to resident compliance items.
Any item set up in Resident Compliance can then be pulled into the resident’s Emergency Packet.
In addition to maintaining documents provided by the vaccine site, you can also choose to export the details you record in ALIS in the resident’s Emergency Packet and their Report Card.
Emergency Packet
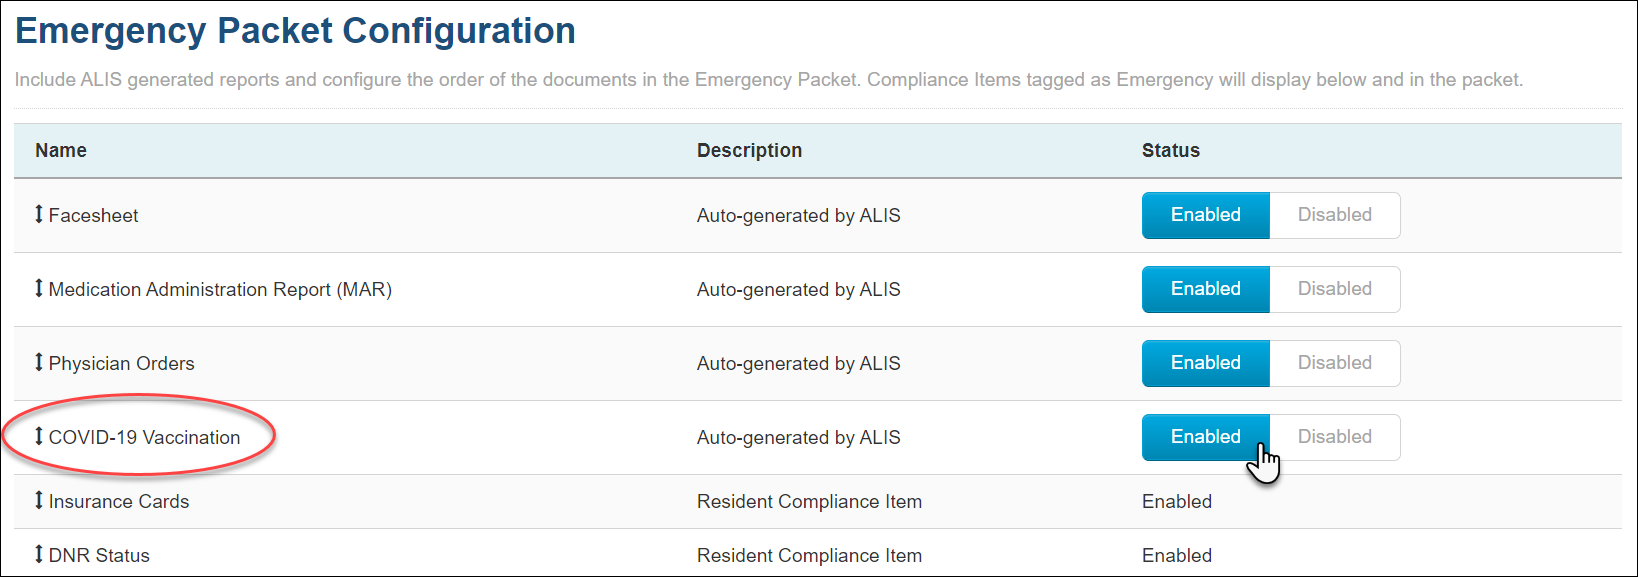
In order for the vaccine information to pull in here, go to Resident Compliance Settings, found in Settings > Resident. Below the table of compliance items, we can configure the Emergency Packet items. We want to switch the COVID-19 Vaccination item to ‘Enabled’. We can also sort the order of all Emergency Packet items by clicking them to drag and drop. Going forward, if you click the Emergency Packet button on a resident’s profile, a table of their consent and dose details will display in the PDF document. Read the more detailed guide here.
Report Card
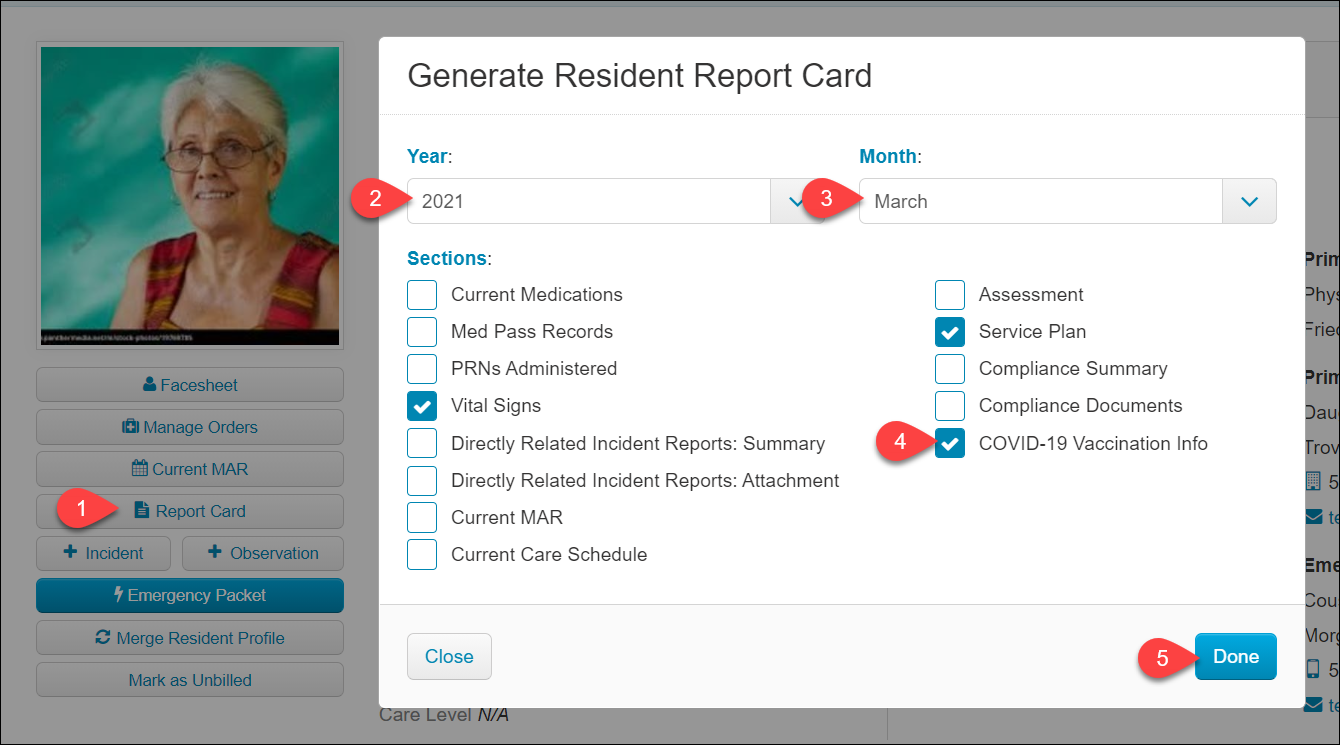
We have added an optional section to the Resident Report Card for COVID-19 Vaccination Info. Selecting this generates a table of their consent and dose details within the document. Learn more about the Resident Report Card here.
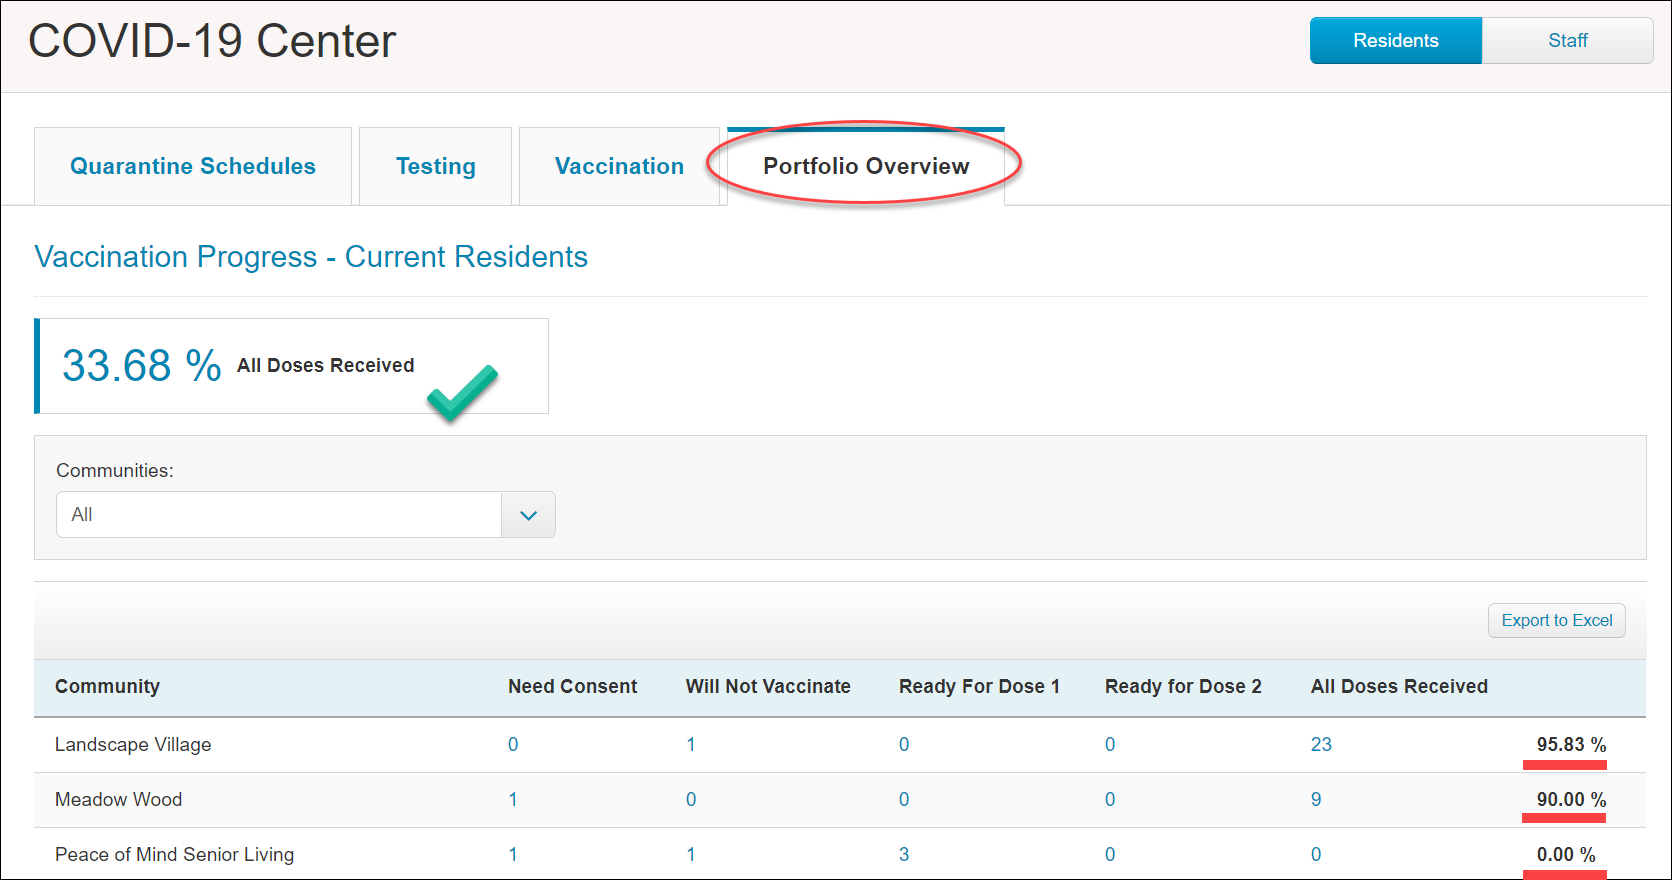
Portfolio Overview for Company Administrators
The Portfolio Overview tab will be useful to those overseeing several buildings within your organization. You can view this separately for residents and staff, and all information here can be exported to Excel.
- The first section of this tab shows the total percentage of all resident or staff who have received all doses of one of the COVID-19 vaccines. This is then broken down by community, and gives us the totals of all buildings in each stage of vaccination at the bottom of each column.
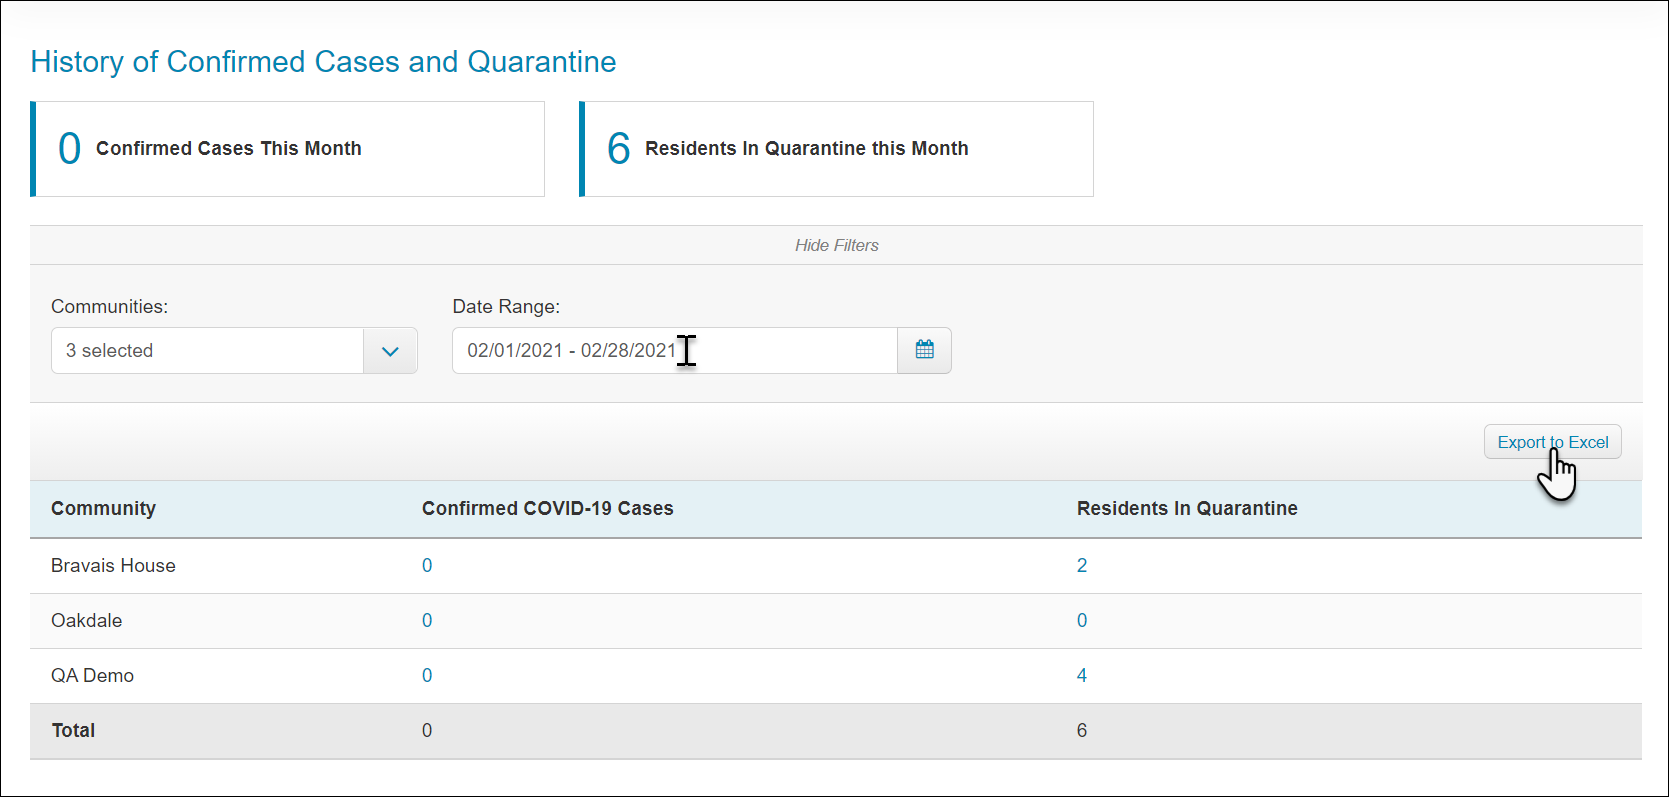
- The middle section of this tab shows us the number of documented COVID-19 cases in the last 14 days, then breaks down this information by community name and whether the cases are residents on premise or off premise.
- The last section of the screen will show the number of documented cases of COVID-19 and the number of residents with the active Quarantine status in the current month. This also gives the ability to select a specific date range of this information.
FAQ:
Where can I view COVID-19 vaccine statuses on my resident’s or staff member’s documents?
These are visible in the Vaccinations tab of COVID-19 Tracking section of the individual’s profile.
These also may be added as a Resident Compliance Item where you can upload the vaccination card for the resident, and configured to pull into the Emergency Packet. An image of the vaccination card will be included whenever the packet is generated (along with the Facesheet and other medical documents).